DSpace 9.x System Requirements
- Debian: Version 12
- JDK: JDK 17
- Apache Maven: Version 3.8.7 or above (Java build tool)
- Apache Ant: Version 1.10.13 or later (Java build tool)
- Relational Database (PostgreSQL):
- PostgreSQL versions supported: 14.x, 15.x, 16.x or 17.x (with pgcrypto installed)
- Apache Solr: Version 9.x (full-text index/search service)
- Solr 9.x or above is recommended, Must set solr.config.lib.enabled=true if using Solr 9.8 or later
- Servlet Engine:
- Supported options: Apache Tomcat 10.1.x or higher
- Node.JS
- Version 18.19+, 20.x, or 22.x ,Preferably LTS (even-numbered versions)
DSpace 9.x consists of a Java-based backend and an Angular-based frontend. Both the backend and frontend need to be installed independently
Installation Steps
System Update and Upgradesudo apt update && sudo apt upgrade -y
JDK installation and configurationsudo apt install openjdk-17-jdk -y
Identify the Java Version Installedjava -version

Add Java Environment Variablecd /etcsudo nano environment
Copy paste the bellow lines to the newly opened blank file. dont forgot to change the java version which i marked in red colour if it is different from mine
JAVA_HOME="/usr/lib/jvm/java-17-openjdk-amd64"
JAVA_OPTS="-Xmx2048M -Xms1024M -Dfile.encoding=UTF-8"
Save and close the file.
Configuration Explanation
- Increased heap size:
- -Xmx2048M: Maximum heap size is increased to 2GB.
- -Xms1024M: Initial heap size is increased to 1GB.
- This provides more memory for DSpace to operate, potentially improving performance, especially when handling large datasets or heavy loads.
Apply the following commands to check Java Home Environment is Configured successfullysource /etc/environmentecho $JAVA_HOMEecho $JAVA_OPTS
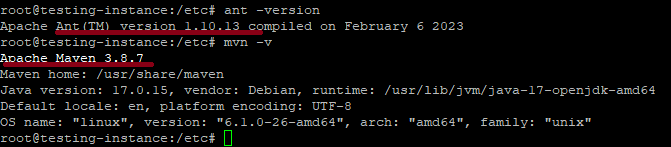
Maven & Ant Installationsudo apt install maven ant -y
Check the Version Details of ant (version should be 1.10.x or above) and maven (version should be 3.5.4 or above) ant -versionmvn -v
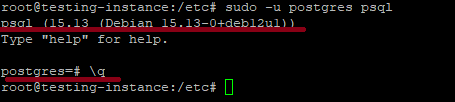
To install DSpace 9.x , you need PostgreSQL version 14.x, or 15.x or 16x or 17x with the pgcrypto extension installedsudo apt-get install postgresql postgresql-client postgresql-contrib libpostgresql-jdbc-java -y
Identify the version of Postgresql Installed ( in my case it is psql 15.xx)sudo -u postgres psql
exit from postgresql console\q
Start PostgreSQL (Don’t forgot to change the postgreSQL version as per your installation)sudo pg_ctlcluster 15 main start
Check the status of PostgreSQLsudo systemctl status postgresql
Set Password to PostgreSQL Usersudo passwd postgres
# I have given dspace as password for my training installation.
Switch to postgres unix Usersu postgres
Execute the bellow command in postgres user to check whether it support UTFpsql -c "SHOW SERVER_ENCODING"
If it return UTF8 which means the UTF8 is Supported
Exit from postgres userexit
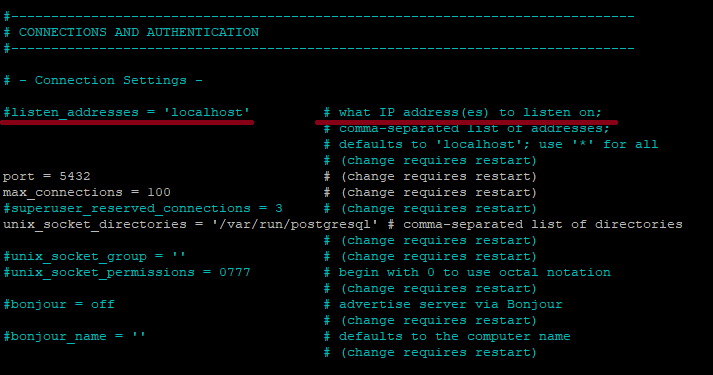
PostgreSQL Configurationcd /etc/postgresql/15/mainsudo nano postgresql.conf
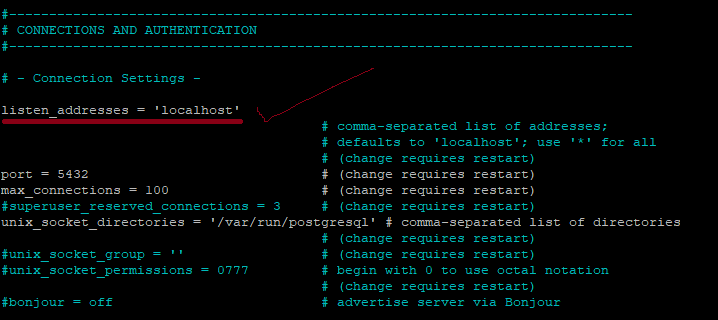
The above command will open pgsql configuration file, in which UNCOMMENT (remove the # symbol From the First Portion) the line listen_addresses = ‘localhost’ under connection settings option. Save and exit
Before Change Screenshot
After Change Screenshot
Postgres Security Tighten Commandsudo nano pg_hba.conf
it will open the Postgres configuration file in which Add a comment above the line “# Database administrative login by Unix domain socket”. Name the comment “# Dsapce Configuration”. Then, copy the line below the comment and save it
# Dspace Configuration
host dspace dspace 127.0.0.1 255.255.255.255 md5

Restart postgressudo systemctl restart postgresql
Appache Solr Installation (Don’t forgot to change the solr version as per your installation)
apt install zip unzip -ycd /optsudo wget https://archive.apache.org/dist/solr/solr/9.8.0/solr-9.8.0.tgzsudo tar xzf solr-9.8.0.tgzrm solr-9.8.0.tgz
Create a user named ‘dspace‘ and change ownership of the solr folder to dspacesudo useradd -m dspacesudo passwd dspacesudo chown -R dspace:dspace /opt/solr-9.8.0/
# I Have given dspace as password for my training installation
Now to ensure Apache Solr can handle a large number of open files and processes, especially under heavy load or large datasets. we need to do some more changes
Set Recommended Limits for dspace User
open limits.conf file
sudo nano /etc/security/limits.conf
Add the bellow lines at the bottom of the limits.conf:
dspace soft nofile 65000
dspace hard nofile 65000
dspace soft nproc 65000
dspace hard nproc 65000
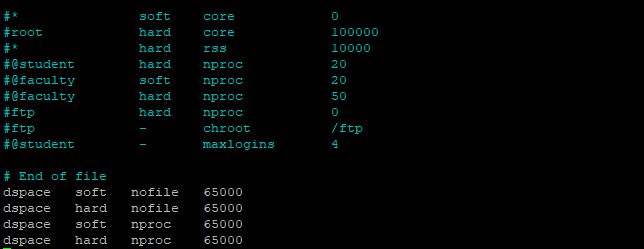
This ensures that the DSpace user can open enough files and spawn enough processes for Solr.
Set Systemd Limits (Optional but Recommended)
If you’re running Solr via systemd, do the following:
Create override directory:
sudo mkdir -p /etc/systemd/system/solr.service.d
Create or edit the override config:
sudo nano /etc/systemd/system/solr.service.d/override.conf
Add Bellow line to the override.conf
[Service]
LimitNOFILE=65000
LimitNPROC=65000

Now replaces the running systemd process with a new instance without rebooting the system and reloads all unit files (like .service, .socket, .mount, etc.) from disk into systemd’s memory.
sudo systemctl daemon-reexecsudo systemctl daemon-reload
Install lsof
sudo apt install lsof
What changed in Solr 9.x?
In Solr 9.x, for security improvements, the default binding interface was explicitly changed to localhost (127.0.0.1).
Reason:
- Binding only to localhost prevents accidental exposure of the Solr admin interface and API endpoints to external networks, reducing potential security vulnerabilities in fresh installations.
What should you do now?
If you need external access in Solr 9.x, you must enable the SOLR_JETTY_HOST. for that follow the bellow steps
sudo nano /opt/solr-9.8.0/bin/solr.in.sh
this will open a file in which find the line #SOLR_JETTY_HOST=”127.0.0.1″ and replace it with SOLR_JETTY_HOST=”0.0.0.0″ (to enable it in all network)or with SOLR_JETTY_HOST=”your-ip-address-here” (to enable it only to a specific network ip) . in my case i’ll enable it in all network, but for production server it is better to enable in the localhost or in a specific ip
Before making changes

After Making Changes

Switch user to dspace unix usersu dspace/opt/solr-9.8.0/bin/solr start -p 8983
Wait until Solr Starts
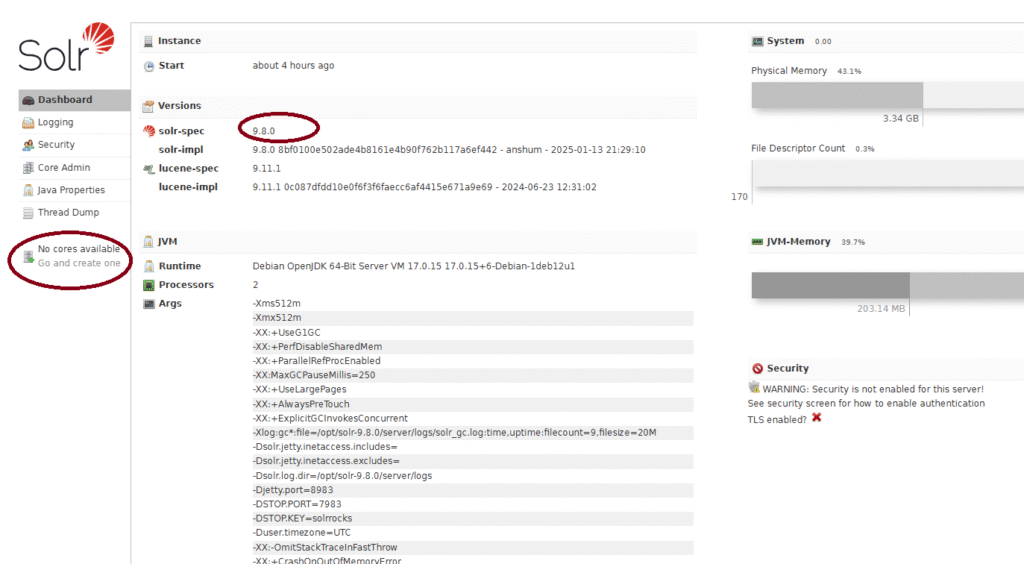
After the execution complete browse, the solr url
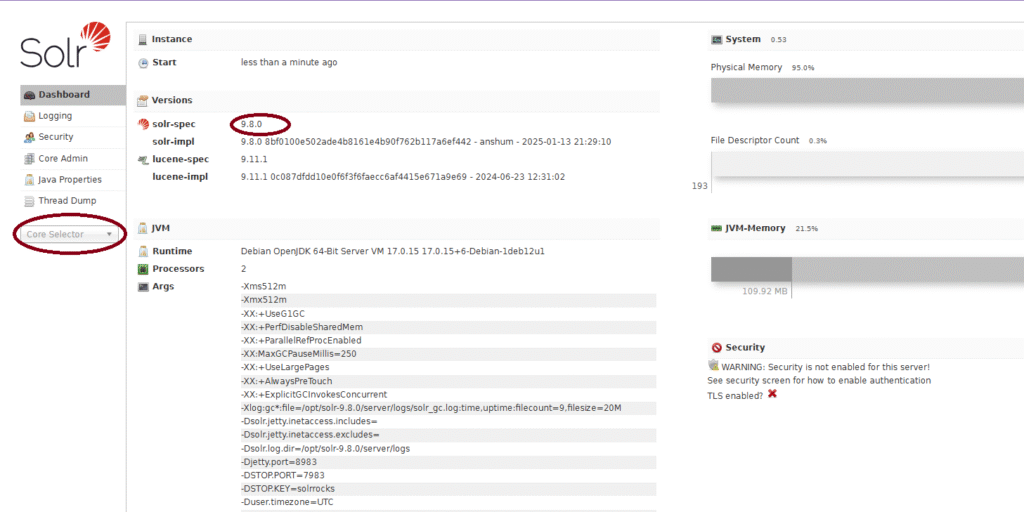
http://your-ip-address:8983 – It will show the solr page
create corn job for Solr to auto start on System Rebootcrontab -e -u dspace
Add the below line in the bottom of cron job opened@reboot /opt/solr-9.8.0/bin/solr start -p 8983
Save and exit
Restart Cron Jobsudo systemctl restart cron.service
TOMCAT 10 Installation and configuration
Now open a new terminal with root user privilege please don’t close the existing terminal, We can call the existing dspace user tab as (dspace user terminal) and root user terminal as (root user terminal)
Commands to execute in sudo user terminal are listed bellow (in my case root is the sudo user)
su root
Install Tomcat10.1 or higher
sudo apt install tomcat10 -y
Tomcat 10 Configurationcd /lib/systemd/system/sudo nano tomcat10.service
It will open a file in which move to security section and add the bellow line as last option to security and then save the file and exit
ReadWritePaths=/dspace/
When you directly modify Tomcat’s main service file, your changes can be overwritten during package updates or service restarts. This is because the package maintainers provide the default configuration, and your direct edits are seen as deviations. to fix it follow the bellow steps
sudo mkdir -p /etc/systemd/system/tomcat10.service.d/
sudo nano /etc/systemd/system/tomcat10.service.d/override.conf
Add your ReadWritePaths:
Inside override.conf, add the following, making sure to replace /dspace/ with the actual path you need:
[Service]
ReadWritePaths=/dspace/
(Optional)If you need to grant access to multiple paths, list them separated by spaces: (Nothing to do just for info)
[Service]
ReadWritePaths=/dspace/ /another/path/ /yet/another/path/
Create Required Dspace folder and provide Sufficient User privileges
cd /sudo mkdir /dspacesudo chown -R dspace:dspace /dspacesudo systemctl daemon-reloadsudo systemctl restart tomcat10
To test tomcat is working execute the URL in your browser with your IP address
http://your-ip-address:8080
Next modify tomcat configurationcd /etc/tomcat10sudo nano /etc/tomcat10/server.xml
Locate the bellow mentioned line
<Connector port="8080" protocol="HTTP/1.1"
connectionTimeout="20000"
redirectPort="8443" />
Comment the line with <!— in the first line and –> in the last line
Add the bellow lines just above to the commented line and save the content and exit the console
<Connector port="8080"
              minSpareThreads="25"
              enableLookups="false"
              redirectPort="8443"
              connectionTimeout="20000"
              disableUploadTimeout="true"
              URIEncoding="UTF-8"/>
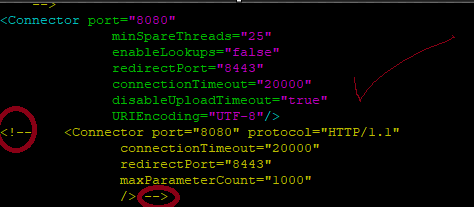
Now Restart the Tompcat9 with the new configuration
sudo systemctl daemon-reloadsudo systemctl restart tomcat10.service
Dspace 9.0 Backend installation
sudo apt install git -y
Commands to execute In dspace user Terminal ……… Please note that this should not be executed with sudo privilege in terminal. By changing the Version number mentioned in red , you can install any 7.X versions
su dspacecdwget https://github.com/DSpace/DSpace/archive/refs/tags/dspace-9.0.zipunzip dspace-9.0.ziprm dspace-9.0.zipcd DSpace-dspace-9.0
POSTGRES CONFIGURATION
Open a New Terminal and login as Postgres Usersu postgrescd /etc/postgresql/15/main
Now we are going to create the user named dspace by executing the bellow command after executing the bellow command it will ask for a password remember the password that you have typed .. this is the connection password for dspace db
createuser --username=postgres --no-superuser --pwprompt dspace
# In my installation I have given dspace as password
Now we are going to create a Db named Dspace and going to make the dspace user which we have created in the previous step as the owner for dspace db
createdb --username=postgres --owner=dspace --encoding=UNICODE dspace
Enable PgCrypto Extension
psql dspace -c "CREATE EXTENSION pgcrypto;"
Apply the following command to exit from postgres user.exit
Commands to execute In dspace user Terminal ……… Please note that this should not be executed with root terminal or postgres terminal
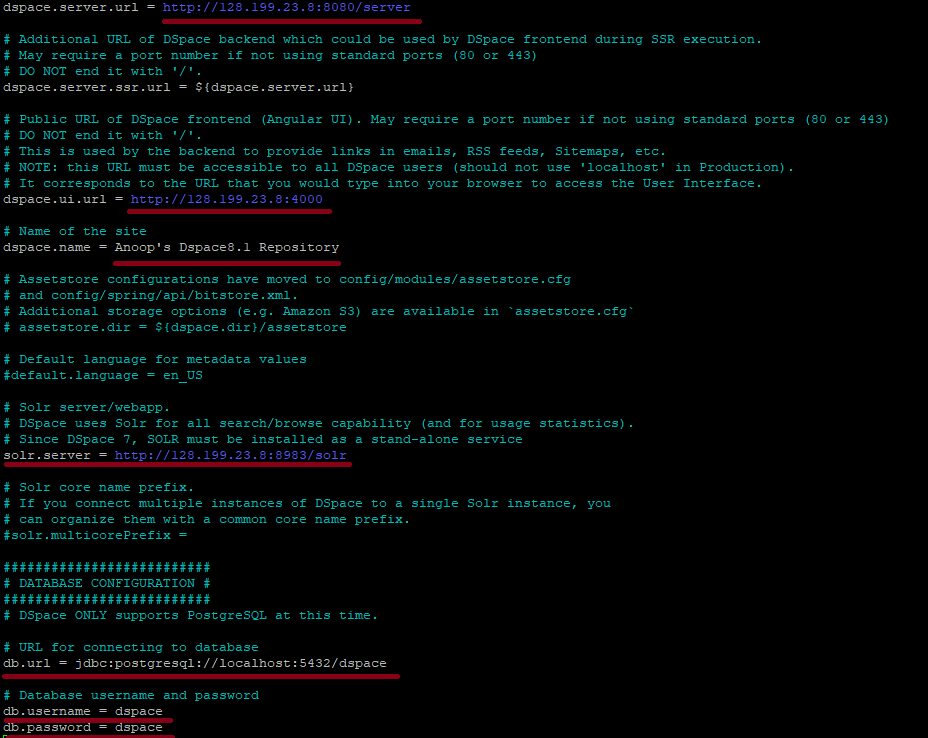
su dspacecd /home/dspace/DSpace-dspace-9.0/dspace/configcp local.cfg.EXAMPLE local.cfgnano local.cfg
It will open a file in which change the details marked in red colour to your server details and save the file
dspace.server.url = http://your-ip-address:8080/server
dspace.ui.url = http://your-ip-address:4000
dspace.name = Your Repository Name
Uncomment Solr.server line and change the line as below
solr.server = http://your-ip-address:8983/solr
Under Database configuration provide the actual db.username and db.password set by you.
db.username = dspace
db.password = dspace
Make sure you are executing the bellow commands as dspace unix usersu dspacecd /home/dspace/DSpace-dspace-9.0mvn package
The above command will take 10 to 30 minutes sometimes more than that which depends up on your internet speed and server responses. If everything done well you will get a BUILD SUCCESS Message in the end
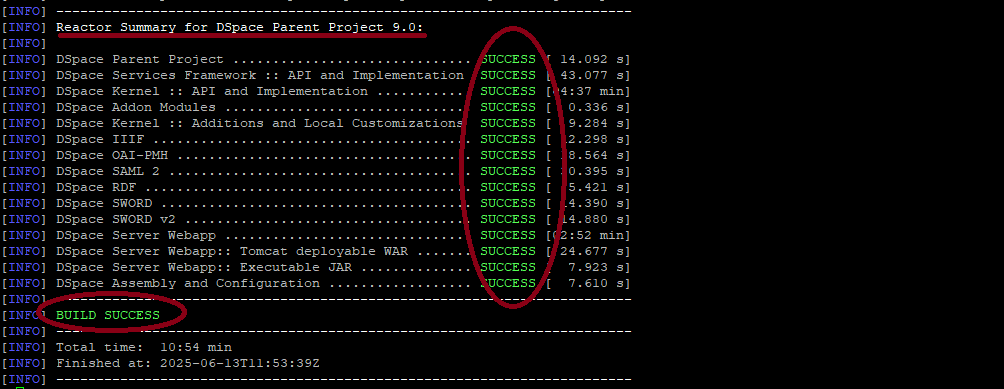
Now Execute the bellow steps to initiate a fresh installsu dspacecd /home/dspace/DSpace-dspace-9.0/dspace/target/dspace-installerant fresh_install
If everything done well you will get a BUILD SUCCESS Message in the end. Now the backend installation completed
Now we need to do the database initialisationcd /dspace/bin./dspace database migrate
The Above command will take more time to complete. Once its complete you will get a done message.
Run the bellow command as sudo user terminal since the tomcat folder owned by root
su rootsudo cp -R /dspace/webapps/* /var/lib/tomcat10/webapps/ROOT/sudo cp -R /dspace/webapps/* /var/lib/tomcat10/webapps/
Check whether server folder in rooot & webapps copied using the bellow command
ls -la /var/lib/tomcat10/webapps/ROOT/ls -la /var/lib/tomcat10/webapps/
There you can see the server folder with root as owner
Now run the commands in dspace unix user terminal
su dspacecp -R /dspace/solr/* /opt/solr-9.8.0/server/solr/configsetschown -R dspace:dspace /opt/solr-9.8.0/server/solr/configsetscd /opt/solr-9.8.0/bin
/opt/solr-9.8.0/bin/solr stop -p 8983
/opt/solr-9.8.0/bin/solr start -p 8983
Now open browser and browse http://your-ip-address:8983 and test that you are able to see the core selector dropdown menu in the left pane and sometime you can see a Error Message “SolrCore Initialization Failures” which means that Solr is unable to load the ICU-related analysis class, which is part of the ICU Analysis plugin that is not included in Solr core by default.
Screenshot Before Issue
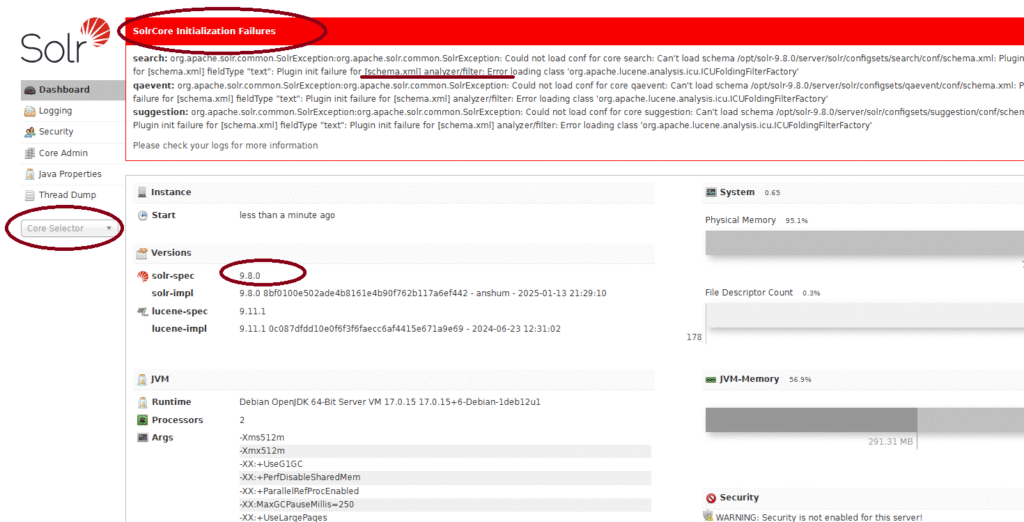
Why This Happens
The ICUFoldingFilterFactory is part of Solr’s analysis-extras module, specifically the ICU (International Components for Unicode) package. DSpace’s default Solr schema (e.g., for search, qaevent, suggestion cores) expects this filter for handling advanced Unicode folding (e.g., converting é → e, ß → ss).
But in our case, Solr is unable to find the ICU classes because they’re not loaded.
Solution: Enable ICU Plugin in Solr 9.8.0
/opt/solr-9.8.0/bin/solr stop -p 8983
Download the ICU plugin JAR
You can use wget or curl to download the ICU analysis plugin directly from Maven Central:
wget https://repo1.maven.org/maven2/org/apache/solr/solr-analysis-extras/9.8.0/solr-analysis-extras-9.8.0.jar -P /opt/solr-9.8.0/server/solr/lib/
Tell Solr to load the plugin
Edit solr.in.sh
nano /opt/solr-9.8.0/bin/solr.in.sh
Add the following line to the end of the file and save it
SOLR_OPTS="$SOLR_OPTS -Dsolr.modules=analysis-extras"

now start solr and reload the page (http://your-ip-address:8983) the issue will be fixed
/opt/solr-9.8.0/bin/solr start -p 8983
Screenshot After Fix
Now create dspace administrator account
/dspace/bin/dspace create-administrator
Provide answer for the Queries prompted in the screen
Run the bellow command as sudo user terminal since the tomcat folder owned by root
su rootsudo chown -R tomcat:tomcat /dspacesudo systemctl daemon-reloadsudo systemctl restart tomcat10.service
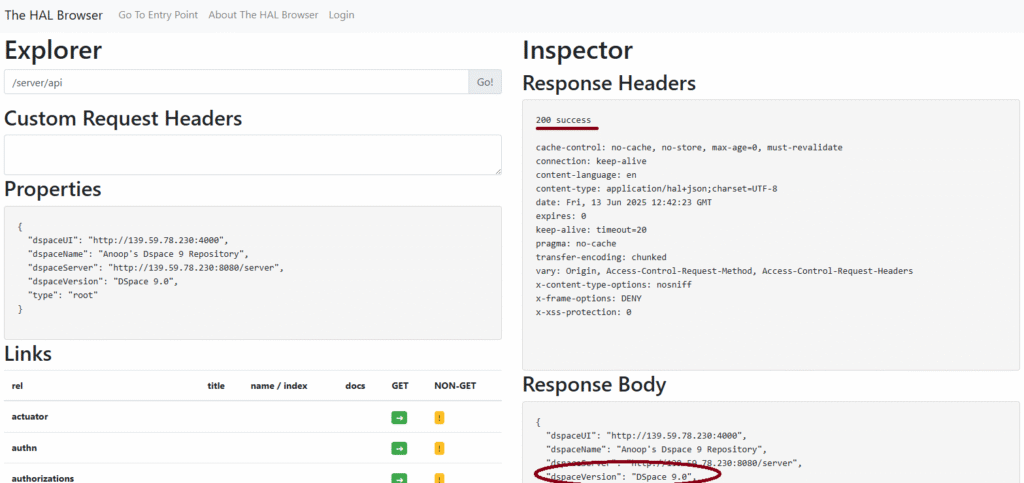
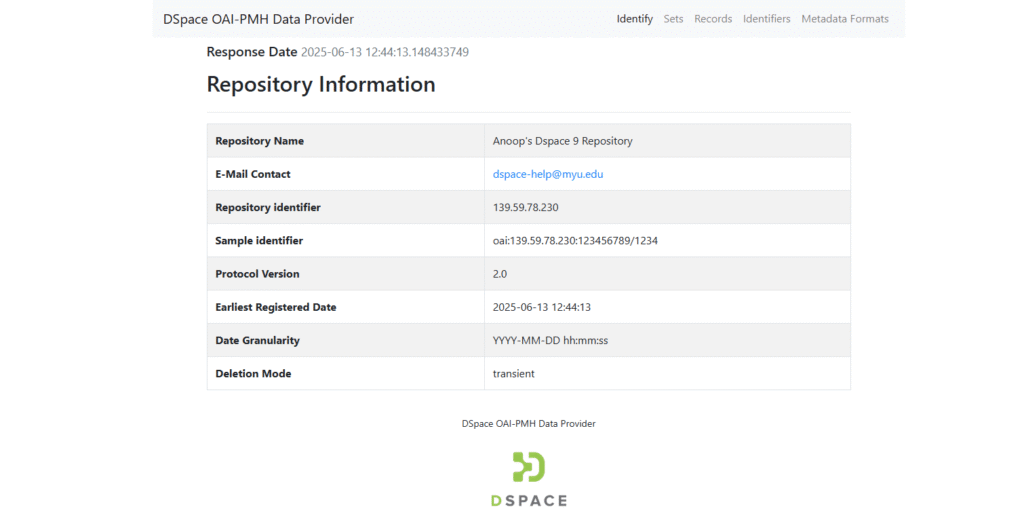
Now Open a Browser and test the bellow pages are displaying
http://your-ip-address:8080/server/#/server/api
http://your-ip-address:8080/server/oai/request?verb=Identify
Dspace 9.0 Angular – Frontend Installation
Node Installation
Run The Commands in sudo user Terminalsu root
Install node version managercurl -o- https://raw.githubusercontent.com/creationix/nvm/v0.39.1/install.sh | bash
Reboot Serverreboot
Load NVM to the terminal sessionsource ~/.nvm/nvm.sh
Install npmsudo apt install npm -y
Install yarnsudo npm install -g yarn
Install node 18.19+, 20.x, or 22.x ,Preferably LTS (even-numbered versions) for our Yarn Installation)
sudo npm install -g n
List the Latest Stable Version
n ls-remote --stable
Presently the Stable Version is 22.16.0 , in Our Dspace Scenario we may install 18.19+ or 20 or 22 versions only ( in my case I installed 20.19.2 while preparing the document)
sudo n 20.19.2
Install pm2 (node.js process manager)sudo npm install -g pm2
Install required angular dependenciessudo npm install -g yarn
Angular Frontend Installation
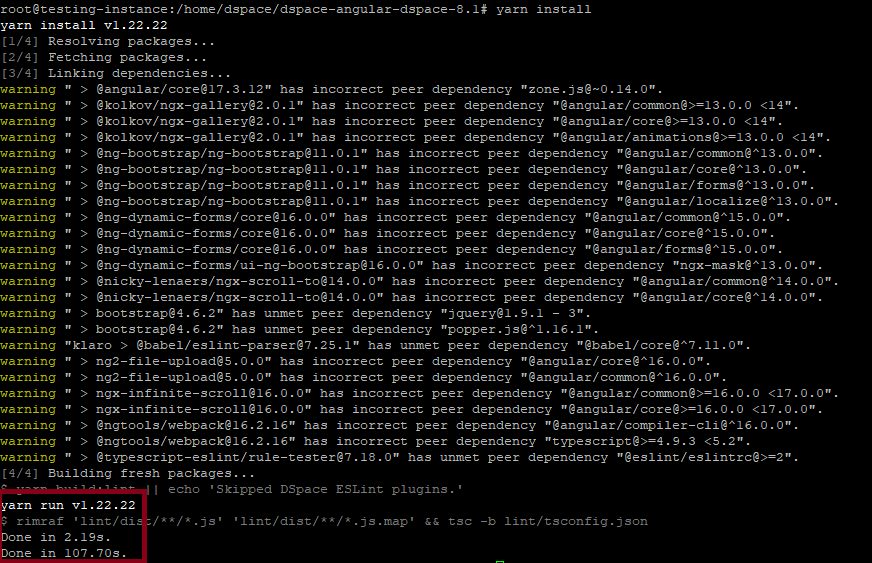
cd /home/dspace/wget https://github.com/DSpace/dspace-angular/archive/refs/tags/dspace-9.0.zipunzip dspace-9.0.ziprm dspace-9.0.zipcd /home/dspace/dspace-angular-dspace-9.0yarn install
Now Edit the Angular Configuration File
cd /home/dspace/dspace-angular-dspace-9.0/configcp config.example.yml config.prod.ymlnano config.prod.yml
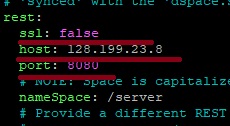
The above command will open a file in which Edit the contents marked in red to your ip address and save the file
ui:
  ssl: false
  host: your-ip-address
  port: 4000

If we don’t have ssl then make the bellow changes

rest:
  ssl: false
  host: your-ip-address
  port: 8080

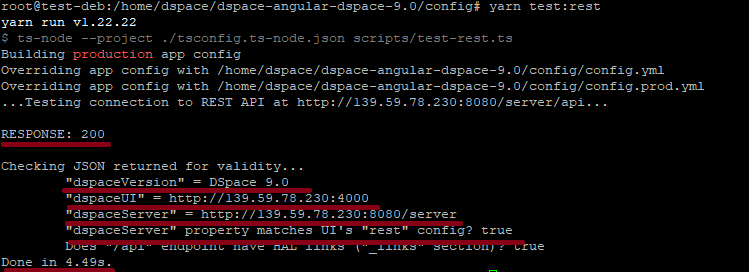
The bellow command will check whether the connections work well or not
yarn test:rest
Add Missing Dependency @popperjs/core
yarn add @popperjs/core
Frontend building Command
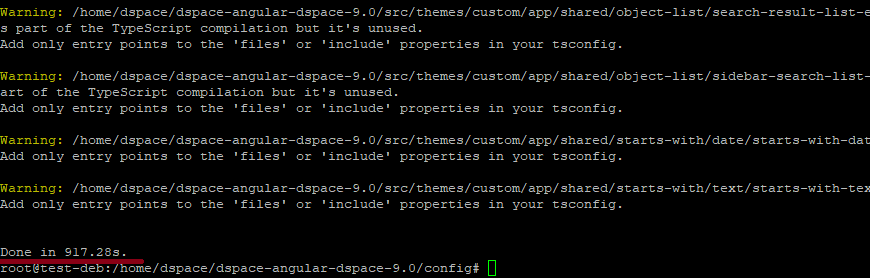
yarn build:prod
if the above command fails then try to run the bellow command (Optional, Run only if the above command failed), the value marked in the red color is the maximum Ram size i would like to allocate to run this process in my Case it is 6GB if you have more GB ram available the you can give that size here
NODE_OPTIONS="--max_old_space_size=6144" yarn build:prod
The above command may take 10 to 30 minutes to complete the build generation. Wait for it. After completion you will get a Done message
Create Production Json File
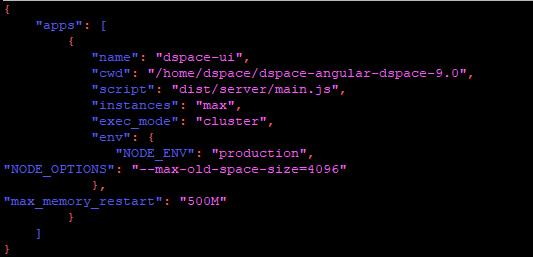
cd /home/dspace/dspace-angular-dspace-9.0/nano dspace-ui.json
the above command will open a blank file , Copy paste bellow lines to the file and change the red marked content to your actual path and version. then save the file
{
    "apps": [
        {
           "name": "dspace-ui",
           "cwd": "/home/dspace/dspace-angular-dspace-9.0",
           "script": "dist/server/main.js",
           "instances": "max",
           "exec_mode": "cluster",
           "env": {
              "NODE_ENV": "production",
"NODE_OPTIONS": "--max-old-space-size=4096"
           },
"max_memory_restart": "500M"
        }
    ]
}
Special Note About the above Configuration
1. Setting “exec_mode” to “cluster” will enable cluster mode , which allows networked applications (HTTP(s)/TCP/UDP servers) to be scaled across all available CPUs without any code modifications
2. The “instances” setting allows you to customize how many CPUs are available to PM2 (“max” = all CPUs. But you also can specify a number like “4” = 4 CPUs. )
3. The “max_memory_restart” setting is optional but tells PM2 how much memory to allow per instance. The example above has a maximum of 500MB. If the number of ‘instances’ is 8, that would mean PM2 could use up to 4 x 500MB = 2GB of memory. Therefore, you may wish to modify the values of “instances” and/or “max_memory_restart” to better control the memory available to PM2. Adjust the value according to your server’s available memory and requirements.
4. The "NODE_OPTIONS" On machines with >2GB of memory available, Node will only use a maximum of 2GB of memory by default (see https://github.com/nodejs/node/issues/28202). This 2GB of memory should be enough to build & run the User Interface, but it’s possible that highly active sites may require 4GB or more.
# In this example, my config is named “dspace-ui.json”
Start the Json File using pm2 Commandpm2 start dspace-ui.json

Now if the configurations are ok then you will get a screen where the status are online, open a browser and check the frontend is working
To Start the service on every restart pl add the code in cronjob of the sudo user
su rootcrontab -e
Add the below line in the bottom of cronjob opened and save the file
@reboot pm2 start /home/dspace/dspace-angular-dspace-9.0/dspace-ui.json
Restart crontabsudo systemctl restart cron.service
As an additional mechanism To start a PM2 service using the .profile option in Debian 11, you can add the PM2 startup command to your .profile file, which is executed each time you log in.
su root
Open your .profile file located in your home directory with a text editor.nano ~/.profile
Add the following line at the end of the .profile file: and save it
pm2 start /home/dspace/dspace-angular-dspace-9.0/dspace-ui.json

To apply the changes without logging out and back in, you can source the .profile file:source ~/.profile

For managing the PM2 process and ensuring it restarts on system reboot, you can set up a PM2 startup script with systemd. This is done by running the following command:pm2 startup systemdsystemctl enable pm2-rootpm2 save
Yes! We have completed the installation process. 🎉😊
Browse the Bellow URL and Test Everything Working Well
http://your-ip-address:4000